

This post explain how to convert heic images to png iPhone. HEIC is the default picture format on the iPhone for an excellent factor. It only works half the data size of a JPEG image and consume a lot of storage. But it’s not suitable for different gadgets and sites. So undoubtedly, there comes the time when you just have to transform a minimum of a few of your captures to a more widely-used format.
How You Can Convert HEIC Images To PNG Iphone
In this article, you can know about convert heic images to png iPhone here are the details below;
We currently have a design on converting HEIC pictures to the JPG format. The conversion procedure for that is as easy as copying and pasting the images to the Data app. However, what about the PNG format? Not as easy.
If you want to transform your photos from HEIC to PNG, you can use any of the multiple online conversion tools or application out there. But they present problems to your privacy and are quite troublesome to use too.
This is why I’m going to talk about a technique that utilizes nothing but your iPhone to carry out HEIC to PNG conversions.
Create HEIC to JPG Shortcut
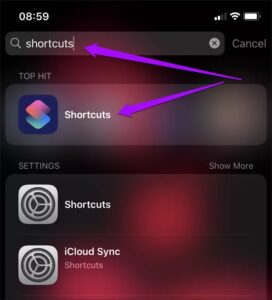
To convert HEIC pictures to the PNG format using your iPhone, you need to develop a shortcut utilizing the Shortcuts app. If you don’t have the Shortcuts app set up, you can get it from the App Shop.
Now, constructing the Shortcut does not require you to do anything insane. As long as you follow the actions listed below, all it takes is a couple of minutes to include and tweak the actions required to convert the images.
Once you’ve developed the Shortcut, it can convert heic images to png iphone separately, and you can utilize it to process HEIC images in batches too. So consider it time well spent.
Note: Before we start, I suggest developing a fresh album in the Photos app. You can then define as the output destination for converted PNG images while constructing the Shortcut.
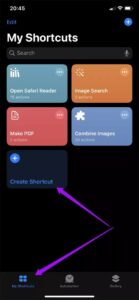
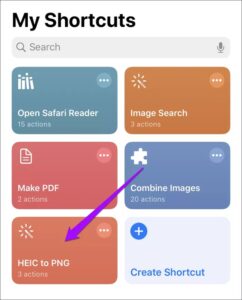
Action 1: Open the Shortcuts app on your iPhone.

Action 2: Switch to the My Shortcuts tab, and then tap Build Shortcut. On the New Shortcut screen that shows up, tap ‘Search for apps and actions’ at the bottom of the screen.

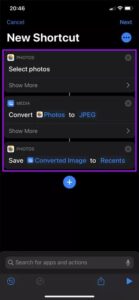
Action 3: Look for and add the actions listed below in the following order:
- Select Photos
- convert heic images to png iphone
- Save to Image Album

Pointer: After adding an action, tap ‘Search for apps and actions’ at the bottom of the screen to quickly begin looking for the next action.
Action 4: Carry out the following modifications to the actions that you simply added:
- – Select image- expand action and turn on the switch beside Select Several
- – convert heic images to png iphone – alter the output format from JPEG to PNG
- – Save Converted Images to Recents – define a destination album (in this case, I have picked an album named PNG).


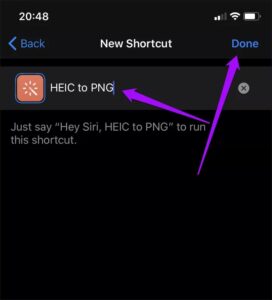
After that, tap Next.
Action 5: Add a name for the faster way, such as HEIC to PNG. Tap Done.

That’s it. The faster way is to live and ready to go.
HEIC to PNG Shortcut in Action
To start reforming HEIC images to the PNG format, tap the Shortcut that you simply developed using the Shortcuts app. It’s noted within the My Faster ways tab. Alternatively, you can run it through the Shortcuts widget in Today View or by triggering Siri and saying, “Hey Siri, “

On the image picker that appears, browse to an album, and pick the photo or images for conversion; you can pick as many pictures as you want.
When you have selected the image or images, tap Done. Our faster way tile within the Shortcuts app will fill as it goes through each phase of the conversion procedure. Quite beneficial when transforming lots of images.
After the faster way converts all the picked files, you can find the PNG images in the appropriate Photos app album or underneath the Recents album or All Photos tab if you didn’t define an output album while building the Shortcut.
Keep in mind: The faster way will not replace the HEIC originals with the transformed PNG images. If you wish to delete the original images, you should do that manually.
If you want to validate the output file format, copy and paste any one of the transformed images to a location within the Files app. When you have actually done that, long-press the image, and then tap Information to inspect the data format.
As long as you continued and modified the actions within the faster way correctly, you ought to have no concerns transforming HEIC images to the PNG format. If required, you can always modify an improperly constructed faster way by tapping the horizontal ellipsis sign over the shortcut tile.
Start Converting
Transforming HEIC images to the PNG format gets unbelievably simple once you’ve created this simple Shortcut. So the next time you can’t utilize your HEIC pictures for compatibility reasons, you now know what to do.
The drawback– converted PNG images can take up a ludicrous quantity of storage space (often multiple times the size of the HEIC originals). If storage is an point, you require to try to find much better options.


