
This post will expain audio renderer error. It is yet another workday, you are scrolling within the Instagram feed going bonkers over the adorable dogs and feline images and suddenly a YouTube alert notifying you about a new upload from your preferred developer arrives. To take pleasure in the freshly-uploaded work of art in its greatest splendor, you hop over to your home computer, load YouTube in your preferred browser, and click the video thumbnail.
How To Fix: ‘Audio Renderer Error: Please Restart Your Computer’
In this article, you can know about audio renderer error here are the details below;
However instead of the video, you are greeted by the ‘Audio Renderer Error. Please restart your computer system’ message. How depressing, best? You change to another web internet browser just to discover the same mistake message trailing you. As it ends up, the Audio Renderer Error is typically encountered by Windows users, irrespective of their Windows variation and on all web internet browsers (Chrome, Firefox, Opera, Edge) alike.
Based upon user reports, the Audio renderer error is generally triggered due to defective audio drivers. The chauffeurs may be corrupted, dated, or merely experiencing a glitch. For any users, a bug in the motherboard can also prompt the problem while a bug in the BIOS triggers the Audio Renderer problem in a lot of Dell computers. The mistake is also often come across when using Cubase, a music production program. Depending upon your system and the situation in which the error is encountered, the service differs for each and every one. In this post, we have actually discussed all the options known to solve the Audio Renderer error on Windows 10.
Before we transfer to any advanced/lengthy services, let us abide by the mistake message and restart our computers. Yes, it may appear insignificant but restarting the system helps repair any temporary problems with the chauffeurs and background procedures. Although, this is just a momentary service.
It may fix the concern for a few lucky ones while others would just have the ability to delight in the audio for a couple of seconds before the mistake returns to haunt them. Another short-lived option is to simply disconnect and plug back in the earphones. Unlike rebooting the computer which just works for a couple of seconds, unplugging the earphones is most likely to get you through a whole session prior to the renderer mistake appears again.
After a number of tries, you are likely to get fed up with performing the short-term solutions. So once you have more time at hand try running the native audio troubleshooter and repairing the drivers. Dell computer system users can completely fix the renderer error by updating their BIOS while Cubase users require to alter the audio individual rate and bit depth.
5 Ways To Fix Audio Renderer Error on Windows 10
Method 1: Run the Audio Troubleshooter
Windows has integrated troubleshooters to repair a wide variety of concerns. The troubleshooters are quite helpful if a concern is triggered by something that designers are already knowledgeable about and have, therefore, programmed the repair techniques in the troubleshooters. Microsoft likewise programs in repair treatments for a lot of typically come across errors. To run the Audio troubleshooter–.
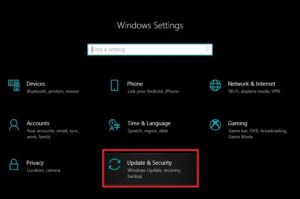
1. Introduce Windows Settings by pushing Windows secret + I then click Update & Security.
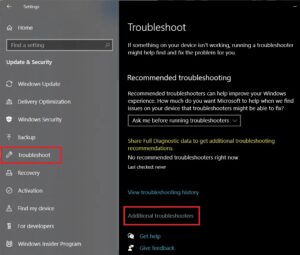
2. Using the shipping menu on the left pane, run to the Troubleshoot settings page. You can likewise open the very same by typing ms-settings: fix in the Run Command box by pressing Windows key + R.
3. On the right panel, click Extra troubleshooters.
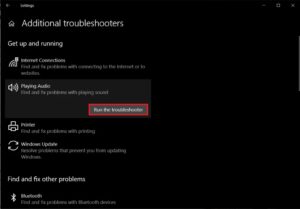
4. Under the Get up and running part, press on Playing Audio to view readily available options then Click on Run the troubleshooter button to start the troubleshooting procedure.
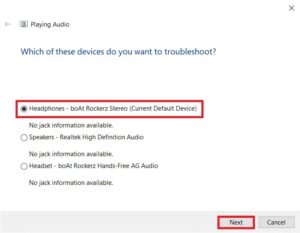
5. After a scan for motorists and audio service, you will be asked to pick a device to repair. Choose the one on which you have been struggling the Audio renderer error & click Next to continue.
6. The troubleshooting process might take a number of minutes. If the troubleshooter undoubtedly finds any issues with the gadget, merely follow the on-screen prompts to repair them.
7. When the troubleshooter has actually discovered and fixed all problems with the audio gadget, reboot your computer system and examine if the renderer mistake dominates.
Method 2: Disable & Enable the Audio Device.
Related to restarting the pc system, users have actually also resolved the concern by streamlining rebooting their audio adapter. Once again, rebooting fixes any temporary glitches with the device drivers and refreshes a faulty circumstances. Also check stardew valley wont launch issues.
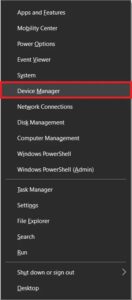
1. Right-click on the Start list button to take forth the Power User menu and choose Device Manager from it.
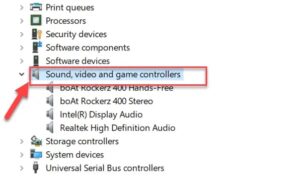
2. Expand Sound, video & game controllers by double-clicking on the label or on the arrow then Right-click on the very first product and choose Disable device from the occurring alternatives.
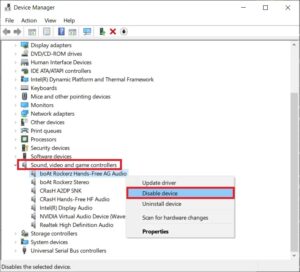
3. Repeat the preceding step for all the noted audio gadgets.
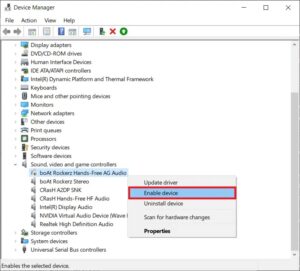
4. After waiting for a minute or 2, Enable all the audio gadgets back again.
Method 3: Uninstall Audio Drivers.
The most obvious culprit for the Audio renderer error is corrupt motorists. Utilizing the Device Manager, we can rollback to a previous version of the audio drivers and inspect if that fixes the issue. If that does not work, corrupt chauffeurs can be uninstalled altogether and be changed by the newest bug-free version. Also, upgrading audio chauffeurs must repair the renderer error for most users. Also check operation did not complete successfully.
1. Introduce Device Manager and expand Sound, video, and video game controllers once again (see actions 1 & 2 of the former method).
2. Double-click on your audio card to reveal the Properties Window.
3. Transfer to the Driver tab and click on Roll Back motorist to go back to a previous chauffeur version (if offered) or Uninstall Device to remove them completely (Try rolling back first and after that uninstalling). Verify any pop-up messages you receive.
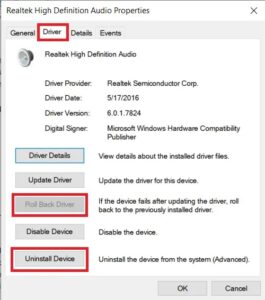
4. If you select to uninstall the audio motorists, just restart your computer to have Windows install them automatically. You can take things into your personal hand and manually download the current drivers from the maker’s website and install them yourself. Third-party applications like Driver Booster can likewise be utilized.
Method 4: Change Audio Sample Rate & Bit Depth.
If you are just encountering the renderer error when a Cubase Window is active, you will require to match the sample rates for Windows sound drivers and ASIO motorists. Various audio sample rates trigger a dispute while playback and trigger the renderer error.
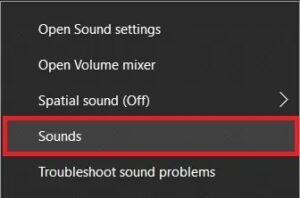
1. Right-click on the Speaker number in the Taskbar and select Sounds from the ensuing choices menu. The Speaker icon may be concealed and can be seen by clicking the upward-facing ‘Show hidden icons’ arrow.
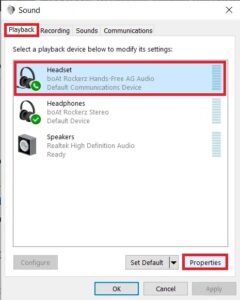
2. On the Playback tab, pick the audio device on which you are experiencing the error and click on the Properties button.
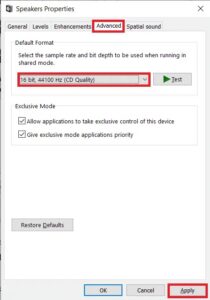
3. Relocate to the Advanced tab of the following Properties Window and select 16 bit, 44100 Hz as the Default Format (or any preferable sample rate) from the drop-down menu.
4. Click on Apply to save the modifications and then on Ok to exit.
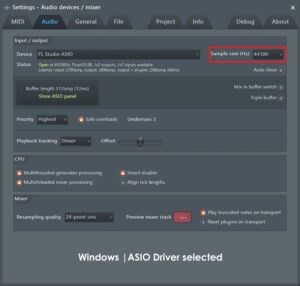
5. Carrying on, open the ASIO Driver Settings Window, also switch to the Audio tab.
6. On the top-right corner, placed the Sample Rate (Hz) to 44100 (or the worth set in Step 3). Restart the pc to bring the changes into effect.
Method 5: Update BIOS (For Dell Users).
If you are a Dell user, the above options may not show fruitful. A number of Dell computer users have reported that a bug in a particular variation of the BIOS software causes the Audio Renderer error and therefore, the concern can just be fixed by updating the software application. Also check limited access issue tp link.
Now, upgrading BIOS can be difficult and seem like a mighty task to an average user. This is where we and our guide on What is BIOS and how to upgrade it? comes in. You can likewise check out the incredibly detailed main guide and an instructional video for the exact same at Dell BIOS Updates.
Note: Before you initiate the procedure of upgrading BIOS, ensure to backup very important information, charge the laptop battery to a minimum of 50%, disconnect external devices such as hard disk, USB drive, printers, etc. to avoid completely damaging the system.